
Google AdSense is by far one of the best ad programs on the planet. Despite multiple alternatives, none has thus far consistently outperformed AdSense in terms of innovation, user-friendliness and overall experience.
On February 21, 2018 the AdSense team launched Google Auto ads for everyone. This is one of the biggest innovation from the AdSense team in the recent time. Auto ads are expected to change the way you have been using AdSense all this while.
One of the biggest concerns of most AdSense publishers is ad placement, ad optimization, and maintaining a pleasant user experience.
Google Auto ads utilize machine learning and artificial intelligence to automatically manage ad placements and ad optimization for the publishers. However, as a publisher, you can manage:
- Global settings: What ads should be shown
- Domain-based setting: Configure what ads should be shown on a specific domain or sub-domain
- Directory settings: Configure the kind of ads shown on the particular directory. For example, on pagination pages or archive pages, you might not want to show matched content ads, and you can configure the same from the AdSense settings panel. This feature is called Advanced URL settings. You can read more about it here.
So far, we have got mixed reviews from users about Auto ads. However, I’m optimistic about the future of AdSense auto ads as it will take away the pain of ad optimization, and a blogger can focus on building content while AdSense takes care of everything else. Google AdSense was always a plug-and-play ad program, but now it’s completely automatic. Thanks to artificial intelligence.
Important things to know about AdSense Auto ads
Auto-ads are not going to be a problem for anyone who has used Google AdSense. However, before setting up Auto-ads, here are a few things you should know. This will also answer your questions before you start integrating it.
- If you already have AdSense ads placed on your blog, you can decide not to remove it. AdSense auto ads will automatically detect those ads and place more ads accordingly.
- Already using Anchor or Vignette ads? Auto ads include Anchor and Vignette ads and additional formats such as Text and display, In-feed, and Matched content ads. Note that all users that use Page-level ads will automatically be migrated to Auto ads without any need to add a code to their page. However, logging in to your AdSense account and setting up Global settings for auto-ads for the first time is a good idea.
How to Enable Google AdSense Auto ads (Complete Guide)
If you would like to learn by watching a video, there is a detailed Google AdSense Auto ad video guide at the end of this tutorial. Here is a quick walkthrough of the steps:
- Login to your Google AdSense account
- Go to Ads > Overview

- Click on ‘by site’
- You will see a list of domains on which AdSense ads are placed; click on the pencil icon to make changes

Enable the option that says “Auto ads”
If your website has manual Google ad placement, then enable the option that says “Optimise your existing ad units?”.
You can select “Ad formats” to enable/disable specific ad formats.

Under the “Ad load” option, you can configure how often the ad should show on your website. I usually keep it medium so that users are not bombarded with too many ads.
Excluded pages option can be used to exclude certain pages from showing AdSense ads. These could be pages where you are running direct banner ads or affiliate ads.
Now, go back to AdSense dashboard > Ads > Overview > By site
Here you will find the Ad codes that you need to add on your website for AdSense auto ads to work.


Now, the big question:
How do I add these ad codes to the website?
Well, there are multiple ways such as using any of the available AdSense WordPress plugin or use this simple header footer code manager WordPress plugin.
Once you have installed the plugin
From WordPress sidebar, select HFCM > Add New
Copy paste the code as shown below:
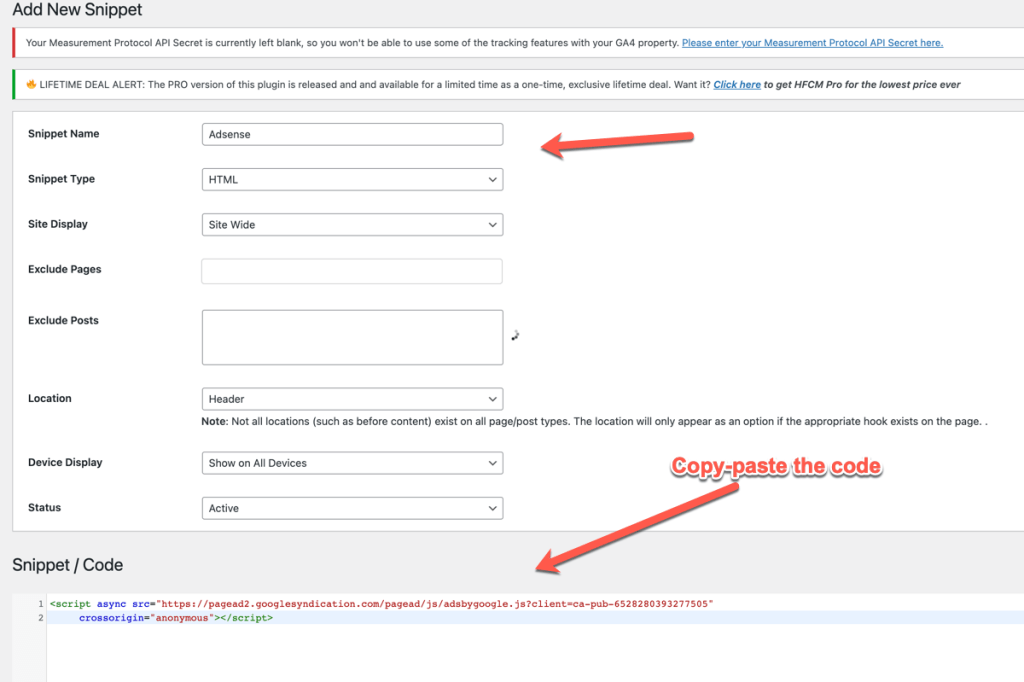
And scroll down to click on save.
What this will do is it will add the Adsense code on all the pages of your website/blog.
That’s it. From here on, your AdSense ads will be automatically optimized according to your website.
For now, here is the video tutorial to set up Google AdSense auto-ads
Let us know about your experience with AdSense auto-ads. Have you implemented it already? If not, when do you plan to implement it? Feel free to ask questions and share your experience. You can also interact with other users on the ShoutMeLoud forum.
Also see: Official AdSense help page on Auto-ads
If you find this tutorial useful, share it with others on Facebook and Twitter.
Here are a few other hand-picked articles for you to read next:
- Monetag Minimum Payout Is Now $25 For New Publishers
- 6 Best Ad Networks For New Bloggers (with Fast Approval)
- Best Ad Management Plugin For WordPress To Make More Money
- 100+ Blogging Tools Categorized (+ Expert Tips)


I’ve been using Auto ads for a while and here are some of my experience:
1. Auto ads take time to find available spots on your website => sometimes it places ads in odd places and hurts user experience. I don’t like this at all.
2. Ad formats are not cool, it seems native ads are more favoured. In my niche, this format earns the least, compared to tradditional banners.
3. I think Auto ads are better on mobile, in terms of takeover ads and/or anchor banner.